
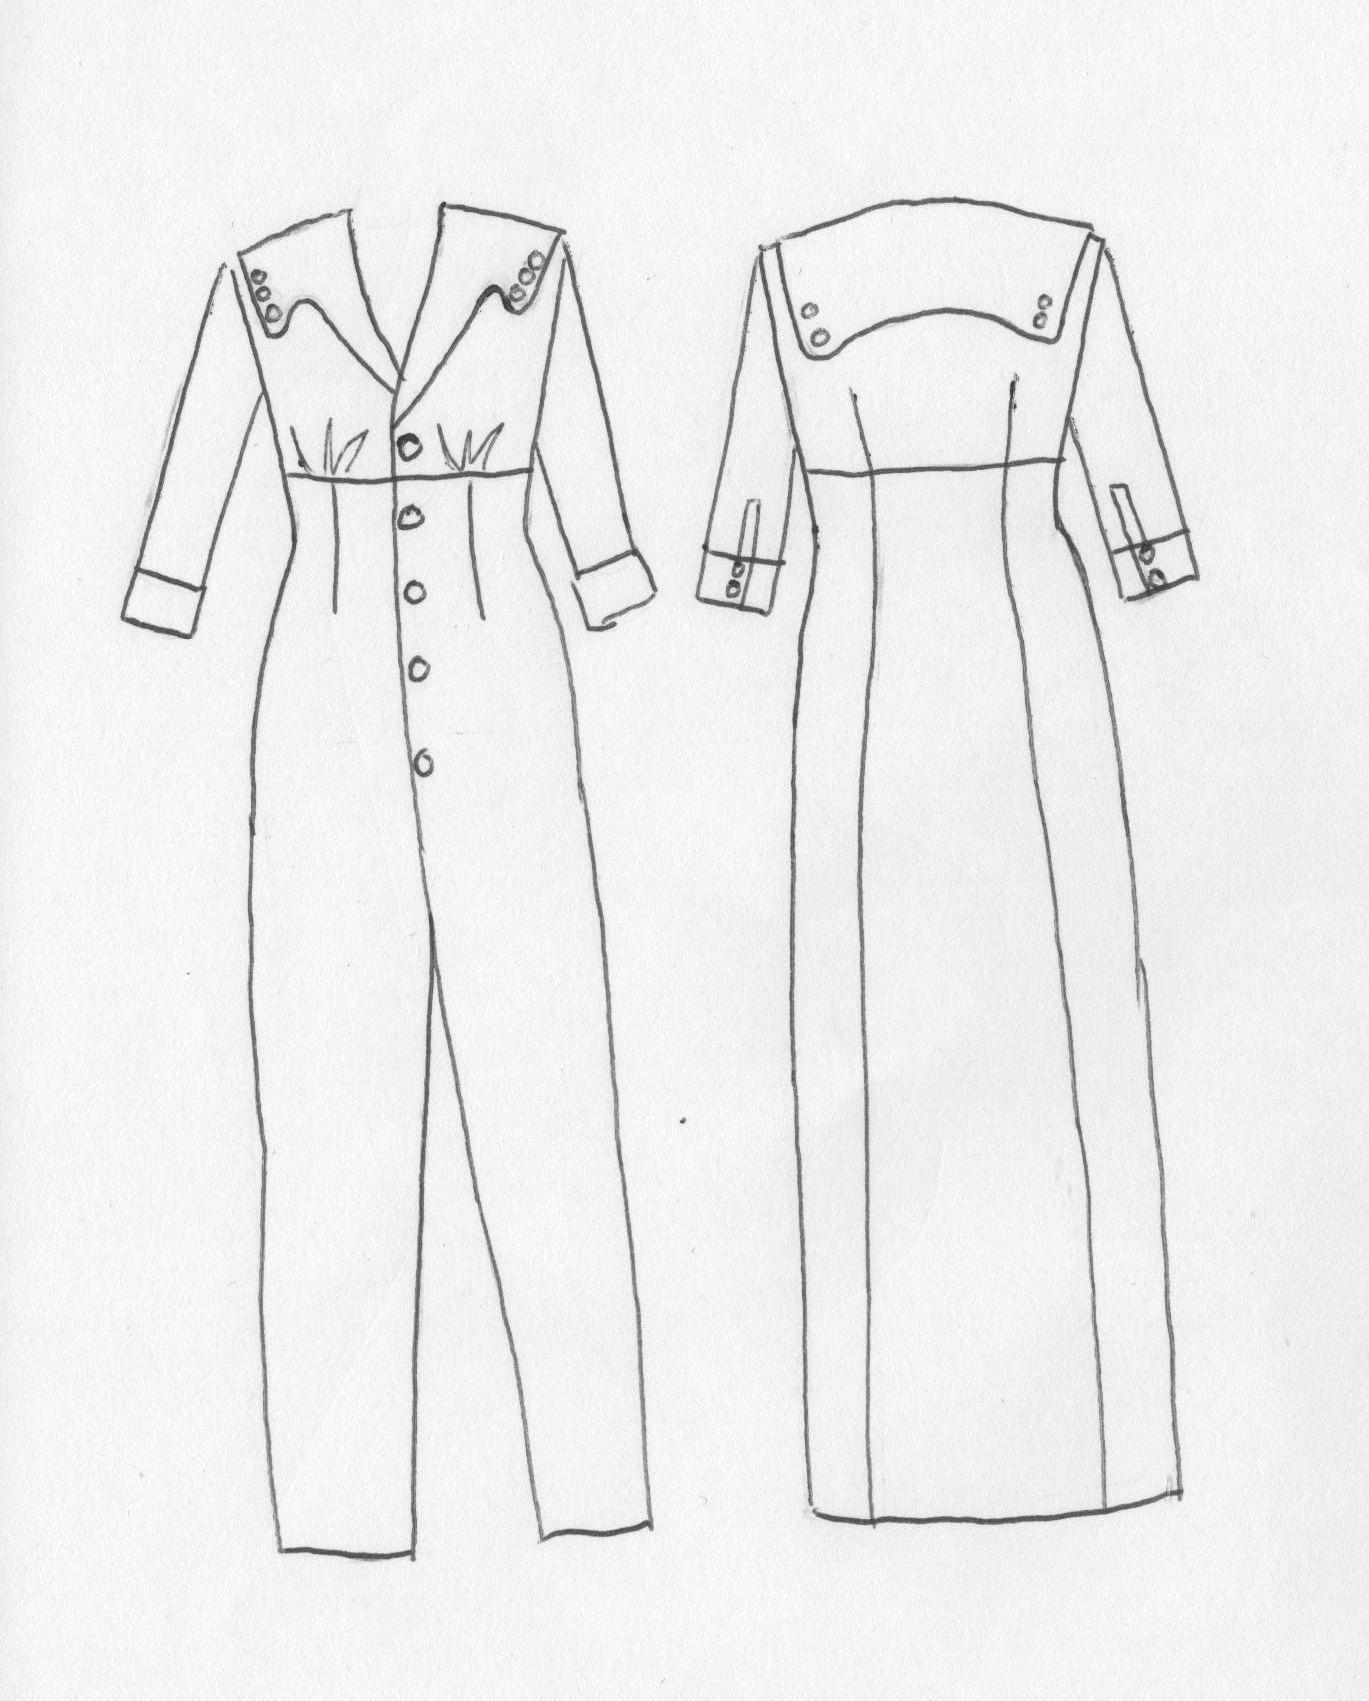
When posting about my new 1913s dress on the HSF page, I got lots of positive feedback and many ladies asked for the pattern. So I decided to to share it.


You must keep in mind I’m no commercial patternmaker, and have only so far drafted for my own use (so don’t expect any wonders). But I’m willing to give it a try.
There are several ways to make a pattern, but here I will show you how I drafted mine.
I will show you the basic pattern blocks I used and go through the patterning process step by step. I will also show you the finished pattern-pieces (something I personally find very useful when figuring out other peoples patterns).
I want to begin by saying that it is a pretty easy and straight forward dress to make, and if you have a bit of experience from drafting and sewing you will probably find these instructions redundant.
And if you are quite new at this – it looks harder than it is, just use logic and take your time to measure everything and just do it one step at a time.
Lets start:
For the basic pattern blocks you will need: A fitted bodice block, a skirt block and a one-piece sleeve block. You can use what method you find easiest to draw up these basic blocks – I use templets from the swedish book Mönster och konstruktioner för Damkläder (pattern-making for womans wear) by Inger Öhman and Hervor Ersman. You can also draft them from scratch using your own measurments.

 Your pieces may look a bit different from mine, but that is nothing to worry about.
Start by measuring the bust, waist and hips of your pattern and make the necessary adjustments to your body measurments. Don’t forget to add some ease (but not too much, since it is a fitted dress).
When the pieces are all measured and altered I like to start with the bodice – leaving the skirt for now.

Start by moving the upper bust dart to the waist dart. Cutting the waist-dart through the middle and closing the upper bust dart at the same time.
Then you can choose either to keep the waist dart as a regular sewn dart, or to take out the waist dart completely by gathering the fullnes at the bust instead. (I use the gathering alternative).
Remove the shoulder dart at the back by reducing the outer shoulder measurment.
And then raise the waist line.
Now your bodice pieces should look something like this.

Now it is time for the collar. It is basically a combination between the “sailor collar” and the “roll collar” but with a twist.
Mark where you want your collar to cross the center front. Add for the buttonstand.
Put the front and back shoulders together and draw the collar.

When I made this pattern, I then made a quick mock-up for the collar to better see the proportions and curves, and to tweak it a bit. If you like you can drape the whole collar on your dressform.


Now it’s time for the sleeves. Cut the sleeve to the desired length (somewhere below the elbow). Measure and draw the cuff, with some extra for the overlapping closure. Mark the back opening.

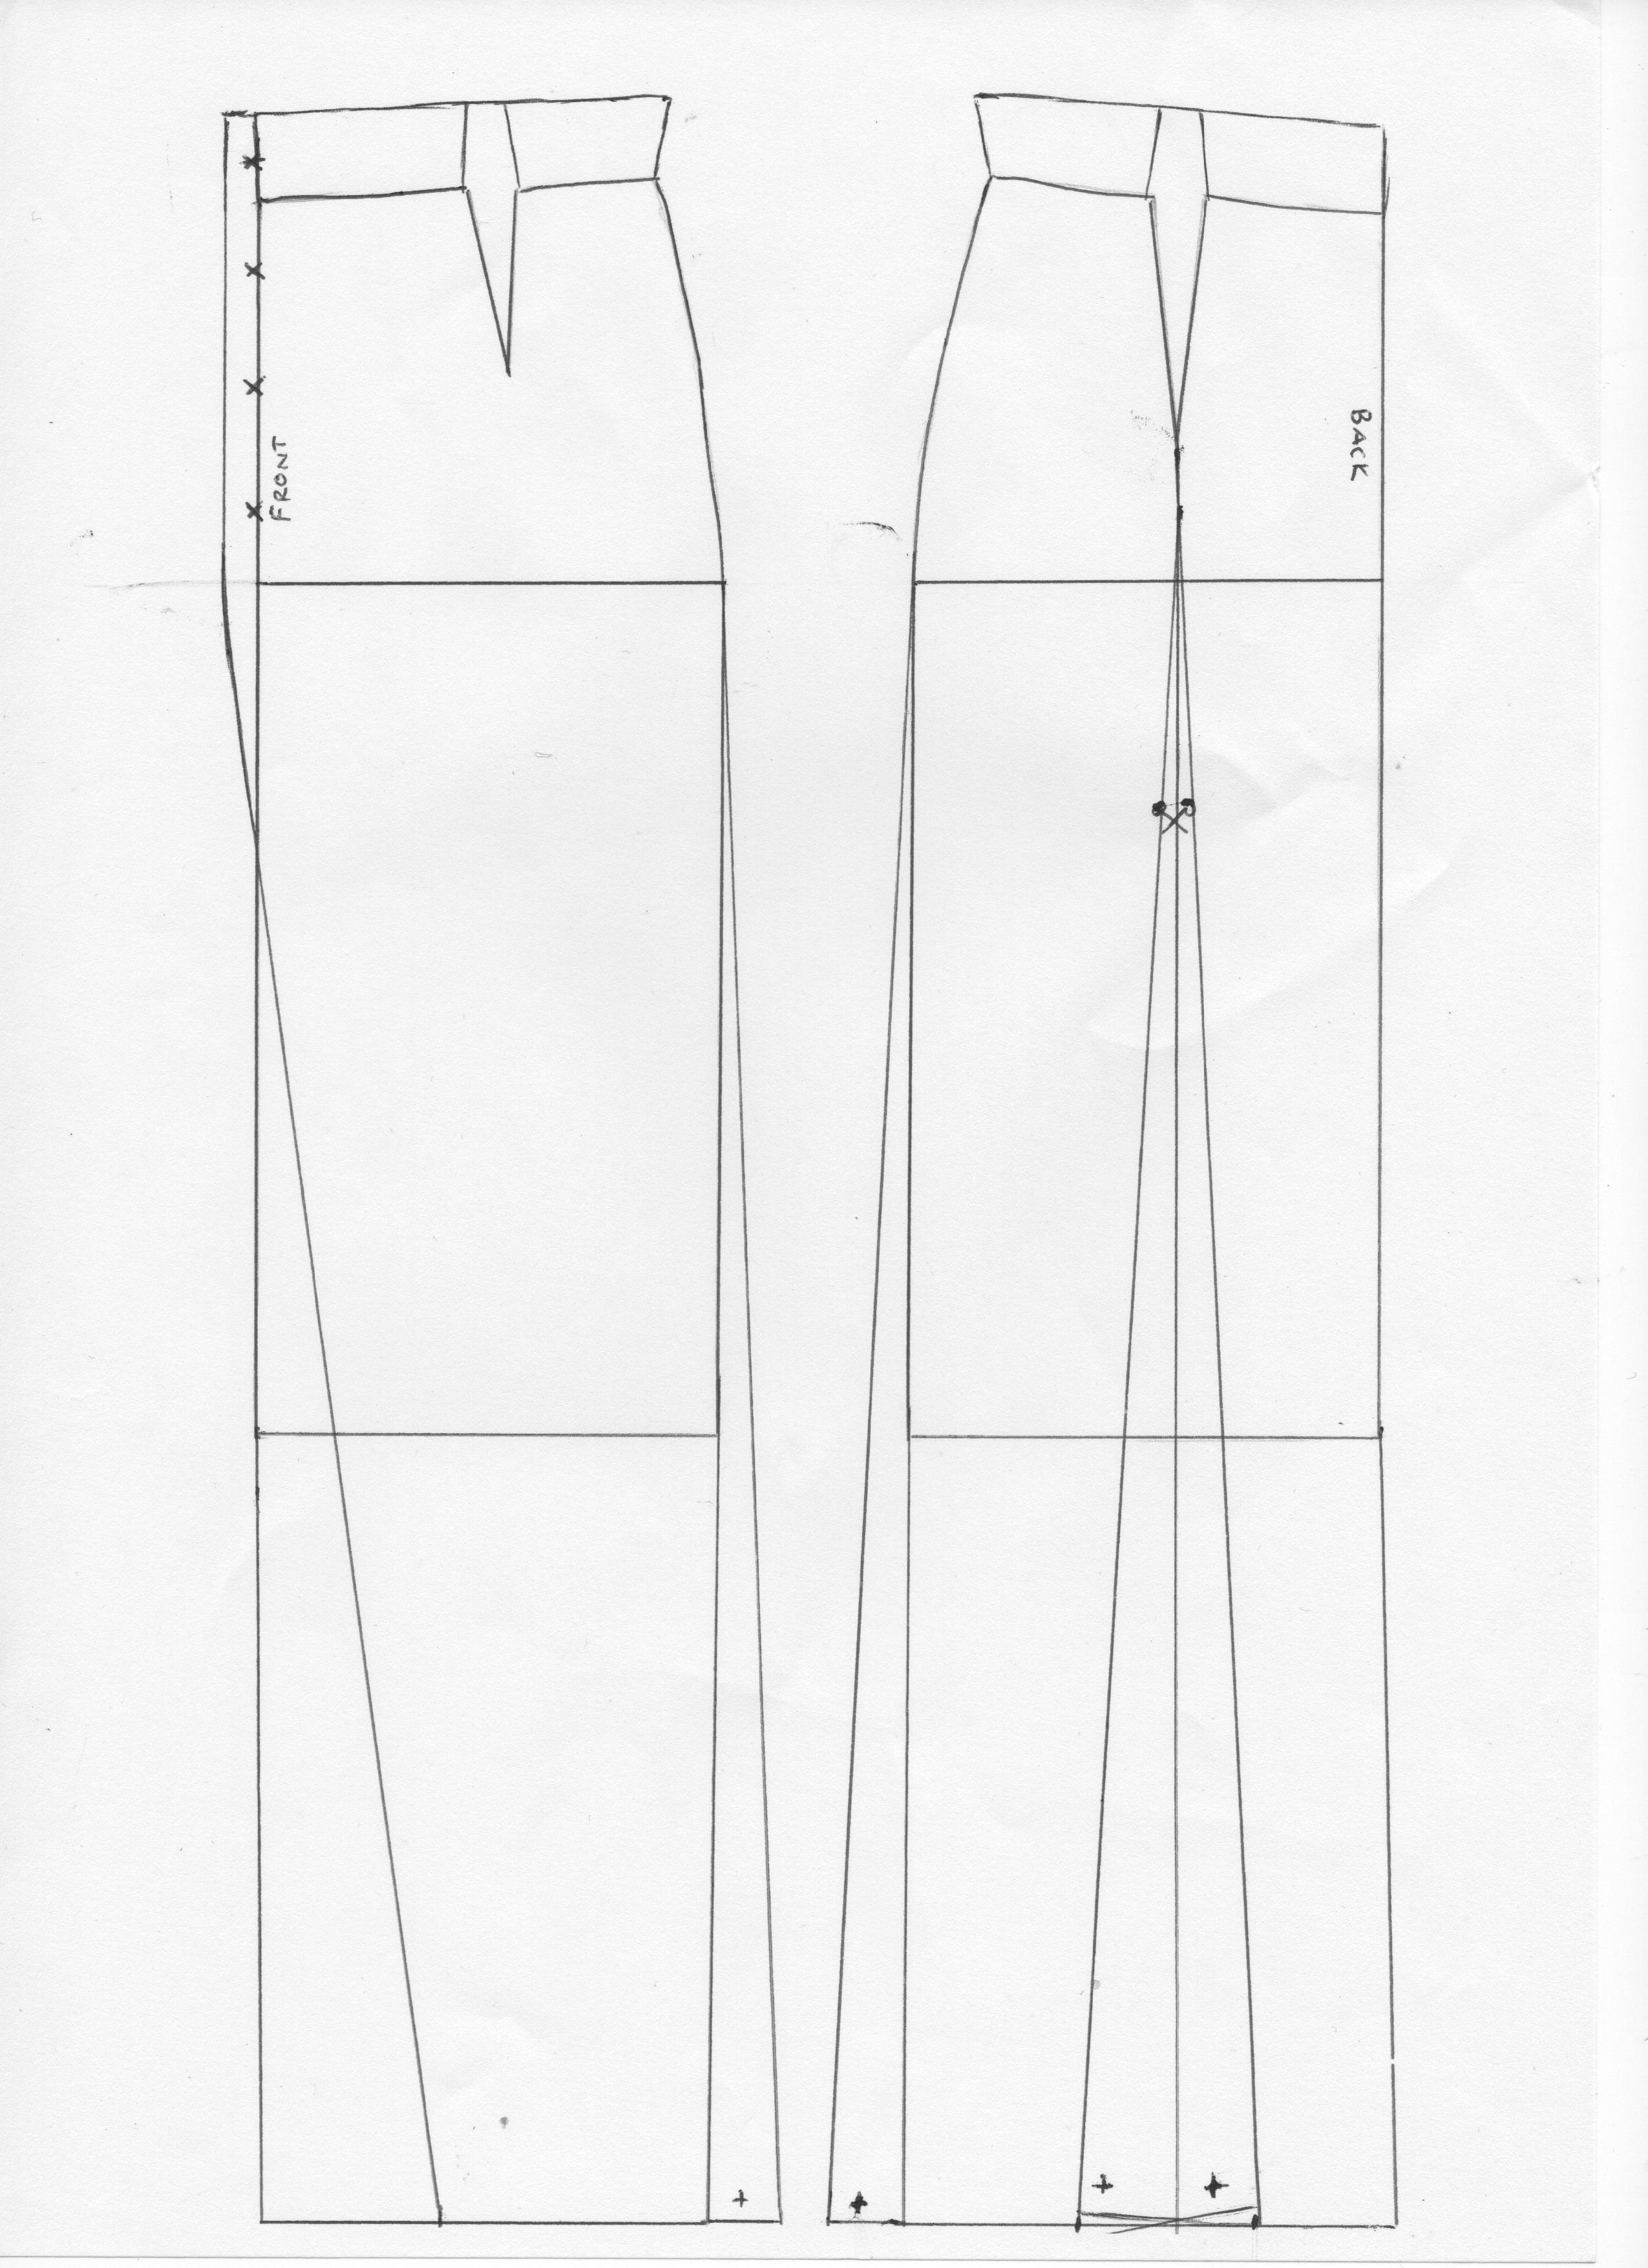
Next up is the skirt. This is a slim skirt, but you can add as much or as little width to it as you like.
Add the raised waist (which you cut off the bodice earlier), and make sure the new waist measurments are right by adjusting the darts.
Split the back skirt down the dart, and add some extra width at the bottom. This will make the back skirt into two pattern pieces.
Add a buttonstand at the front, and draw the opening in the lower skirt panel crossing the front line. Add some extra width at the sides.
When you are done with the drafting you should have a fair amount of pattern-pieces.
 The skirt:
Front (cut 2), Back/side (cut 2) and Back (cut 1 on fold).
The rest:
Bodice front (cut 2), Bodice back (cut 1 on fold), Collar (cut 2 on fold), Facing bodice front (cut 2), Facing bodice back (cut 1 on fold), Facing skirt front (cut 2), Sleeve (cut 2), Sleeve cuff (Cutt 4 or 2 on fold) and Sleeve placket (cutt 4).
I deliberately choosed not to put any numbers or measurments on this guide. Because different people have different taste and body types, so make sure the measurments you use are adapted to your body size and personal preferences.
Always make a mock-up when testing a new pattern. I know it is boring, but you will regret you didn’t when you put lots of work into making a garnment that doesn’t fit right.
The sewing is pretty easy, just make sure to use interfacing in all the necessary places. And don’t neglect cutting down the allowance in the rounded corners of the collar…
Then you should do just fine.

 I hope you found this account useful, and I really like to know if there is anything that is unclear or overly complicated.

Thank you so, so, so much for doing this! I am in love with this dress of yours and have a perfect green wool in my stash. Can’t wait to give it a try!
Oh, I would love to see it.
You are the best!! Thank you so much 🙂
I found your blog through American Duchess, and have greatly enjoyed looking at your sewing projects! This 1913 dress is so gorgeous, and you’ve done a great job explaining how you made it. I have a feeling I’ll be trying to make one myself yet this summer. 🙂
Thank you so much!
And I totaly adore the American Duchess.
Please do try it, its the perfect dress – were you feel both pretty and comftortable, yet not costumy at all.
I love this! I’ve got umpteen projects on my sewing table right now, but I plan to save this and make it later. I am not a professional pattern maker by any means, but I have taken a number of drafting and draping classes and you’ve done a very good job. No apologies necessary on your part. I would love to see
More of your projects. Brava!
I go have a question: what is the white underskirt? I’ve read through your directions for the dress several times and I don’t see that white (or light color) underskirt addressed anywhere. Is it a separate skirt or underdress?
Thank you so much! 🙂
Yes The white skirt is a separate straight skirt made in the same fabric as the collar.
Best of luck with your projects 🙂
You’re very clear with your instructions. Thank you very much.